首页
统计
关于
骗子曝光
Search
1
电脑微信企业微信双开/多开的方法(这可能是最简单粗暴高效的解决方案)
2,388 阅读
2
宝塔面板7.7.0版本原版安装+升级脚本(宝塔面板7.6.0破解版)
773 阅读
3
网址自动推送百度API源码(PHP源码)(百度php推送源代码)
702 阅读
4
宝塔LINUX企业永久付费破解版(宝塔企业版破解版)所有专业版企业版插件免费使用!
564 阅读
5
宝塔面板插件破解方法(宝塔面板插件破解方法教程)
524 阅读
闲聊
线报
WinForm
WinForm成品
WinForm源码
WinForm代码段
WEB
HTML代码
PHP代码
网站文章
网站源码
建站程序
Typecho
Typecho模板
Typecho插件
服务器运维面板
宝塔面板
网络安全
软件工具
技术教程
域名
自营程序
短链网DLW.IM
登录
Search
标签搜索
宝塔面板
源码
BT
WinForm
PHP
Telegram
百度
Typecho
CDN
谷歌翻译
宝塔
nginx
C#
IP
宝塔面板企业版免授权安装脚本
宝塔面板破解版
子比主题
在线截图生成器
网站源码
2023最新可用dai挂网源码
Root
累计撰写
160
篇文章
累计收到
182
条评论
今日撰写
0
篇文章
首页
栏目
闲聊
线报
WinForm
WinForm成品
WinForm源码
WinForm代码段
WEB
HTML代码
PHP代码
网站文章
网站源码
建站程序
Typecho
Typecho模板
Typecho插件
服务器运维面板
宝塔面板
网络安全
软件工具
技术教程
域名
自营程序
短链网DLW.IM
页面
统计
关于
骗子曝光
用户登录
登录
搜索到
8
篇与
窗体
的结果
2023-05-05
winform添加任务栏(系统托盘)
要在 WinForm 中添加任务栏,可以使用以下步骤:1.打开 Visual Studio 并创建一个新的 WinForm 应用程序。2.在工具箱中找到 NotifyIcon 控件并将其拖动到窗体上。3.在属性窗口中设置 NotifyIcon 的图标、文本等属性。4.在窗体的 Load 事件处理程序中添加以下代码:private void Form1_Load(object sender, EventArgs e) { notifyIcon1.Visible = true; notifyIcon1.Icon = this.Icon; notifyIcon1.Text = "你的应用程序名称"; }5.在窗体的 Closing 事件处理程序中添加以下代码:private void Form1_FormClosing(object sender, FormClosingEventArgs e) { if (e.CloseReason == CloseReason.UserClosing) { e.Cancel = true; this.Hide(); notifyIcon1.ShowBalloonTip(1000, "提示", "程序已最小化到托盘", ToolTipIcon.Info); } }这样,当用户关闭窗体时,窗体会最小化到任务栏的通知区域,同时 NotifyIcon 会在任务栏的通知区域中显示应用程序的图标和文本。用户可以通过单击图标来恢复窗体。
2023年05月05日
9 阅读
0 评论
0 点赞
2023-05-05
Winform控件优化之背景透明那些事2:窗体背景透明、镂空穿透、SetStyle、GDI透明效果等
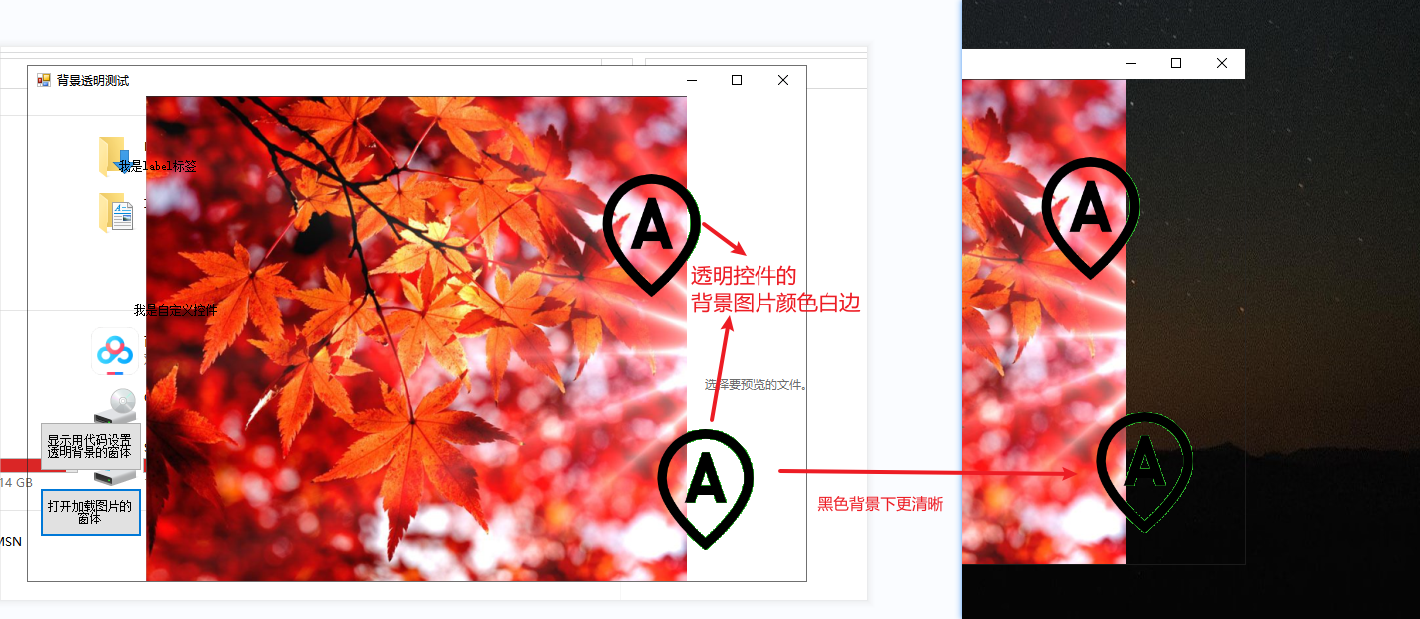
{callout color="#f0ad4e"}简介: 两行代码就能实现Form窗体的(背景)透明效果,它不是Opacity属性的整个窗体透明,TransparencyKey实现窗体的透明、窗体中间部分镂空效果...{/callout}Winform窗体的透明{callout color="#f0ad4e"}此方法也需要.Net Framework 4.0及以上的版本才可以。关键在于TransparencyKey指定和BackColor一样的颜色。窗体默认不支持背景透明设置,指定Color.Transparent无效。TransparencyKey不能取值Color.Black(黑色)。{/callout}两行代码就能实现Form窗体的(背景)透明效果,它不是Opacity属性的整个窗体的透明,而只是背景透明,加上去除边框和标题栏,就能实现很好的背景透明效果。{callout color="#f0ad4e"}// 透明窗体内的透明控件的背景图边缘 会有 BackColor 颜色的白边this.BackColor = Color.LimeGreen;this.TransparencyKey = Color.LimeGreen;{/callout}它会将Form窗体控件设置为透明背景的效果,非常棒。但是会有个小问题,就是透明Form上的透明控件上的图片或背景图片会有一个相应颜色的白边,这算是一个小瑕疵【可以设置窗体的BackColor/TransparencyKey颜色与原本控件上背景图片的颜色尽量一致,尽量避免多出的白边问题】,如下:【这个白边即使指定Color.Empty也无法解除】目前测试,设置背景颜色和TransparencyKey不能取值Color.Black(黑色),它会导致窗体原本的拖动、标题栏中最大最小关闭按钮失效【如果是无边框,则此问题应当不算问题】。BackColor = Color.Lime; // Color.Red\Color.Blue等 TransparencyKey = BackColor;加上无边框窗体的效果:FormBorderStyle = FormBorderStyle.None;理论上设置SupportsTransparentBackColor支持背景透明就可以,但实际无效(猜测,应该是因为主窗体没有父控件的原因,需要有父控件才能生效。不知添加CreateParams的透明设置是否有效)//// 无效 SetStyle(ControlStyles.UserPaint, true); SetStyle(ControlStyles.OptimizedDoubleBuffer, true); SetStyle(ControlStyles.SupportsTransparentBackColor, true); this.BackColor = Color.Transparent; this.TransparencyKey = BackColor;永远显示在窗口最前方,可鼠标穿透的窗体镂空效果通过设置TransparencyKey实现窗体的透明、窗体中间部分镂空,鼠标等可以透过并从透过的部分操作。在一些录屏软件中会需要这种效果,整个窗体镂空部分框选的是录屏的区域,调整区域大小进行适当录屏范围,比如GifCam录屏软件。TopLevel设置Form为顶层窗体,TopMost设置Form始终在最前面。TopLevel=true; TopMost=true; BackColor = Color.Empty; TransparencyKey = BackColor;演示效果如下:TextBox控件的透明TextBox和Form一样,默认不支持设置透明背景色:textBox1.BackColor = Color.Transparent; 会发生异常,控件不支持透明的背景色。通过SetStyle设置支持背景透明。不过TextBox透明也没啥意义,因为透明后看不见文字编辑区域了。 public class TransparentTextBox : TextBox { public TransparentTextBox() { SetStyle(ControlStyles.SupportsTransparentBackColor | ControlStyles.OptimizedDoubleBuffer | ControlStyles.AllPaintingInWmPaint | ControlStyles.ResizeRedraw | ControlStyles.UserPaint, true); BackColor = Color.Transparent; } }背景的不完全透明BackColor = Transparent等实现的都是完全透明,要实现不完全透明,在“完全透明”的基础上,设置BackgroundImage为一张带有百分比透明度的图片。通过图片的透明度,来间接设置控件的透明度CreateParams实现控件透明的设置在继承控件时,通过重写CreateParams,指定透明样式,也可以实现透明。{callout color="#f0ad4e"}该效果只是实现了透明,控件本身、所占位置均存在,且鼠标不能透过操作底层显示出的控件。{/callout}/// <summary> /// A transparent control. /// </summary> public class TransparentPanel : Panel { protected override CreateParams CreateParams { get { CreateParams createParams = base.CreateParams; createParams.ExStyle |= 0x00000020; // WS_EX_TRANSPARENT return createParams; } } }GDI+直接绘制图片或文字实现透明效果(可以针对多图片)此部分参考自 How to Use Transparent Images and Labels in Windows Forms定义通用类绘制图片和文字的通用类,直接继承自Panel,包含抽象方法OnDraw和用于绘制的Graphics对象using System; using System.Drawing; using System.Windows.Forms; using System.Drawing.Drawing2D; /// <span class="code-SummaryComment"><summary></span> /// Use this for drawing custom graphics and text with transparency. /// Inherit from DrawingArea and override the OnDraw method. /// <span class="code-SummaryComment"></summary></span> abstract public class DrawingArea : Panel { /// <span class="code-SummaryComment"><summary></span> /// Drawing surface where graphics should be drawn. /// Use this member in the OnDraw method. /// <span class="code-SummaryComment"></summary></span> protected Graphics graphics; /// <span class="code-SummaryComment"><summary></span> /// Override this method in subclasses for drawing purposes. /// <span class="code-SummaryComment"></summary></span> abstract protected void OnDraw(); }重写CreateParams属性,确保控件实例化时有正确的样式protected override CreateParams CreateParams { get { CreateParams cp = base.CreateParams; cp.ExStyle |= 0x00000020; //WS_EX_TRANSPARENT return cp; } }确保背景不会绘制,需要重写OnPaintBackground方法,并且不进行任何操作;重写OnPaint方法,用于空间绘制自己时调用此处理protected override void OnPaintBackground(PaintEventArgs pevent) { // Don't paint background } protected override void OnPaint(PaintEventArgs e) { // Update the private member so we can use it in the OnDraw method this.graphics = e.Graphics; // Set the best settings possible (quality-wise) this.graphics.TextRenderingHint = System.Drawing.Text.TextRenderingHint.AntiAlias; this.graphics.InterpolationMode = System.Drawing.Drawing2D.InterpolationMode.HighQualityBilinear; this.graphics.PixelOffsetMode = System.Drawing.Drawing2D.PixelOffsetMode.HighQuality; this.graphics.SmoothingMode = System.Drawing.Drawing2D.SmoothingMode.HighQuality; // Calls the OnDraw subclass method OnDraw(); }同时定义一个DrawText方法,用于很方便的绘制文本 #region DrawText helper functions protected void DrawText(string text, Point position) { DrawingArea.DrawText(this.graphics, text, "Microsoft Sans Serif", 8.25f , FontStyle.Regular, Brushes.Black, position); } protected void DrawText(string text, Brush color, Point position) { DrawingArea.DrawText(this.graphics, text, "Microsoft Sans Serif", 8.25f , FontStyle.Regular, color, position); } protected void DrawText(string text, FontStyle style, Point position) { DrawingArea.DrawText(this.graphics, text, "Microsoft Sans Serif", 8.25f , style, Brushes.Black, position); } protected void DrawText(string text, FontStyle style, Brush color, Point position) { DrawingArea.DrawText(this.graphics, text, "Microsoft Sans Serif", 8.25f , style, color, position); } protected void DrawText(string text, float fontSize, FontStyle style, Brush color , Point position) { DrawingArea.DrawText(this.graphics, text, "Microsoft Sans Serif", fontSize , style, color, position); } protected void DrawText(string text, string fontFamily, float fontSize , FontStyle style, Brush color, Point position) { DrawingArea.DrawText(this.graphics, text, fontFamily, fontSize, style, color, position); } static public void DrawText(Graphics graphics, string text, string fontFamily , float fontSize, FontStyle style, Brush color, Point position) { Font font = new Font(fontFamily, fontSize, style); SizeF textSizeF = graphics.MeasureString(text, font); int width = (int)Math.Ceiling(textSizeF.Width); int height = (int)Math.Ceiling(textSizeF.Height); Size textSize = new Size(width, height); Rectangle rectangle = new Rectangle(position, textSize); graphics.DrawString(text, font, color, rectangle); } #endregion使用控件绘制带透明的图片和文本添加一个新类并继承自DrawingArea,在重写的OnDraw方法中实现对图片和文本的绘制class BroculosDrawing : DrawingArea { protected override void OnDraw() { // Gets the image from the global resources Image broculoImage = global::WindowsApplication1.Properties.Resources.broculo; // Sets the images' sizes and positions int width = broculoImage.Size.Width; int height = broculoImage.Size.Height; Rectangle big = new Rectangle(0, 0, width, height); Rectangle small = new Rectangle(50, 50, (int)(0.75 * width), (int)(0.75 * height)); // Draws the two images this.graphics.DrawImage(broculoImage, big); this.graphics.DrawImage(broculoImage, small); // Sets the text's font and style and draws it float fontSize = 8.25f; Point textPosition = new Point(50, 100); DrawText("http://www.broculos.net", "Microsoft Sans Serif", fontSize , FontStyle.Underline, Brushes.Blue, textPosition); } }参考How to: Give Your Control a Transparent Background C# Windows Form Application Transparent button Transparent background on winforms?
2023年05月05日
8 阅读
0 评论
0 点赞
2023-05-04
winform窗体透明背景实现
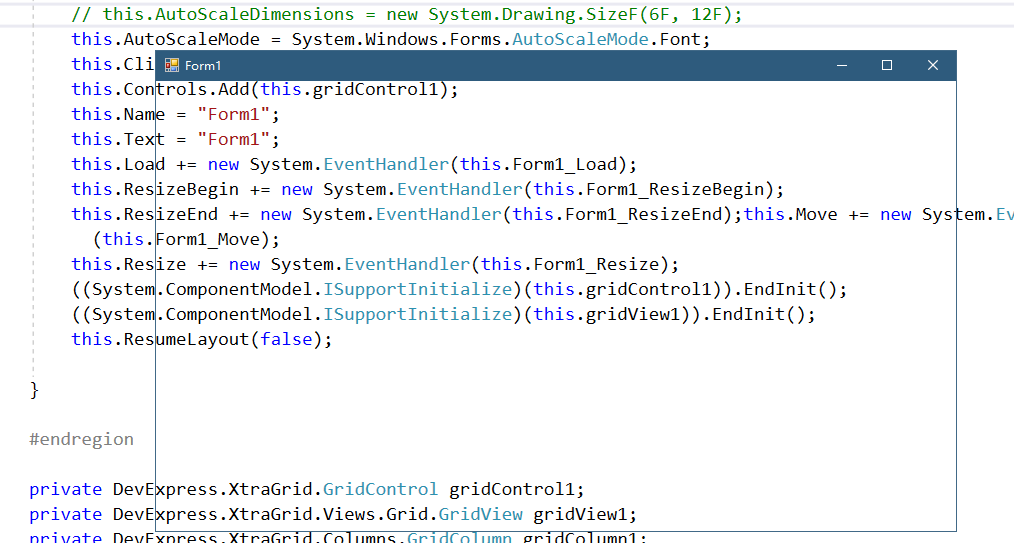
因为winform Form窗体的局限性,不允许设置背景色为transparent。所以不能实现透明背景。这里有一个取巧的方法(截Form后的背景)。首先来看下实现效果:想要实现半透明效果只要加个panel ,将panel设置为背景色透明,然后加个遮罩图片就可以了。以下附上实现代码:using System; using System.Drawing; using System.Windows.Forms; namespace WindowsTrans { public partial class Form1 : Form { private Color tr_color = Color.Transparent; private bool b_start = false; bool[] b_visible = null; public Form1() { InitializeComponent(); } private void Form1_Load(object sender, EventArgs e) { SetBackgroundImageTransparent(); } private void SetBackgroundImageTransparent() { Point pt = this.PointToScreen(new Point(0, 0)); Bitmap b = new Bitmap(this.Width, this.Height); using (Graphics g = Graphics.FromImage(b)) { g.CopyFromScreen(pt, new Point(), new Size(this.Width, this.Height)); } this.BackgroundImage = b; } private void BeginSet() { tr_color = this.TransparencyKey; b_start = true; } private void Setting() { if (b_start) { b_visible = new bool[Controls.Count]; for (int i = 0; i < Controls.Count; i++) { b_visible[i] = Controls[i].Visible; Controls[i].Visible = false; } BackgroundImage = null; BackColor = Color.White; b_start = false; this.TransparencyKey = Color.White; } } private void EndSet() { SetBackgroundImageTransparent(); this.TransparencyKey = tr_color; for (int i = 0; i < Controls.Count; i++) { Controls[i].Visible = b_visible[i]; } b_start = false; } private void Form1_Resize(object sender, EventArgs e) { Setting(); } private void Form1_ResizeBegin(object sender, EventArgs e) { BeginSet(); } private void Form1_ResizeEnd(object sender, EventArgs e) { EndSet(); } private void Form1_Move(object sender, EventArgs e) { Setting(); } } }
2023年05月04日
5 阅读
0 评论
0 点赞
2023-03-19
Winform 程序多开
在使用应用程序的过程中,经常要求应用程序只能运行一次。如果发现重复开启,应从系统进程列表中搜索到已经开启的进程,并将该进程窗口移到最前端显示。实现过程在 Program.cs 文件的 Program 类中声明两个外部调用函数 [DllImport("User32")] private static extern bool SetForegroundWindow(IntPtr hWnd); [DllImport("User32")] private static extern bool ShowWindowAsync(IntPtr hWnd, int cmdShow);两个外部调用 User32.dll 文件中的函数,其中SetForegroundWindow 主要用于将窗体移动到最前端显示,ShowWindowAsync函数用于显示窗体。修改 main 函数内容static void Main() { bool createdNew; //是否是第一次开启程序 Mutex mutex = new Mutex(false, "Single", out createdNew); //实例化一个进程互斥变量,标记名称Single if (!createdNew) //如果多次开启了进程 { Process currentProcess = Process.GetCurrentProcess();//获取当前进程 foreach (Process process in Process.GetProcessesByName(currentProcess.ProcessName)) { //通过进程ID和程序路径获取一个已经开启的进程 if ((process.Id != currentProcess.Id) && (Assembly.GetExecutingAssembly().Location == process.MainModule.FileName)) { //获取已经开启的进程的主窗体句柄 IntPtr mainFormHandle = process.MainWindowHandle; if (mainFormHandle != IntPtr.Zero) { ShowWindowAsync(mainFormHandle, 1); //显示已经开启的进程窗口 SetForegroundWindow(mainFormHandle); //将已经开启的进程窗口移动到前端 } } } mutex.WaitOne(); mutex.ReleaseMutex(); //释放Mutex一次 //MessageBox.Show("进程已经开启"); return; } else { Application.EnableVisualStyles(); Application.SetCompatibleTextRenderingDefault(false); Application.Run(new MainFrame()); } }Mutex类,该类位于System.Threading命名空间下,主要用于创建线程或进程的互斥变量。本实例创建了一个名为Single的互斥变量,在运行程序时,首先访问该互斥变量,看该变量是否已经被创建,如果已经被创建,说明已经有相同的进程正在运行。
2023年03月19日
19 阅读
0 评论
0 点赞
2022-06-12
WinForm系统托盘双击打开窗体
this.Visible = true; this.WindowState = FormWindowState.Normal;//双击打开窗体
2022年06月12日
40 阅读
0 评论
0 点赞
2022-06-12
WinForm关闭窗体时系统托盘不死
在窗体的FormClosing事件添加代码↓notifyIcon.Visible = false;//关闭系统托盘
2022年06月12日
50 阅读
0 评论
0 点赞
2022-02-16
C# 实现类似QQ的窗体在桌面边缘停靠和隐藏
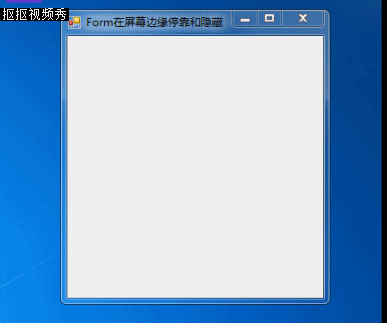
C# 实现类似QQ的窗体在桌面边缘停靠和隐藏设计思路: 1.使用定时器(Timer)来监控鼠标位置和窗体位置,并实现窗体的停靠和隐藏2.当鼠标拖动窗体时,窗体才有可能根据自身位置决定是否停靠3.如果窗体四周没有接触到屏幕边缘则不会停靠4.如果窗体最小化或最大化了则不存在停靠和隐藏5.如果鼠标拖动窗体时,如果窗体很接近屏幕边缘则自动将其停靠在该边缘,例如窗体离屏幕顶部小于4个像素则自动将其停靠在顶部6.窗体可以在桌面的左侧、右侧和顶部停靠和隐藏7.如果既满足顶部停靠的条件又满足侧面停靠的条件,则规定其向侧面隐藏8.当鼠标位于窗体内部时,窗体不会隐藏9.当鼠标位于窗体外部,窗体根据自身的位置决定是否隐藏10.所谓的隐藏实际上并不是真正的隐藏,而是将整个窗体移出屏幕,仅在屏幕边缘留出一小部分11.所谓的显示隐藏窗体实际上并不是真正的显示,而是将窗体再次移入屏幕12.(存在的问题)默认情况下当用户点击“显示桌面”,会使我们隐藏的窗体被最小化。显然这并不是我们想要的结果,该问题暂时保留效果显示: private void timer1_Tick(object sender, EventArgs e) { timer1.Interval = 200; AutoSideHideOrShow(); } void AutoSideHideOrShow() { int sideThickness = 4;//边缘的厚度,窗体停靠在边缘隐藏后留出来的可见部分的厚度 //如果窗体最小化或最大化了则什么也不做 if (this.WindowState == FormWindowState.Minimized || this.WindowState == FormWindowState.Maximized) { return; } //如果鼠标在窗体内 if (Cursor.Position.X >= this.Left && Cursor.Position.X < this.Right && Cursor.Position.Y >= this.Top && Cursor.Position.Y < this.Bottom) { //如果窗体离屏幕边缘很近,则自动停靠在该边缘 if (this.Top <= sideThickness) { this.Top = 0; } if (this.Left <= sideThickness) { this.Left = 0; } if (this.Left >= Screen.PrimaryScreen.WorkingArea.Width - this.Width - sideThickness) { this.Left = Screen.PrimaryScreen.WorkingArea.Width - this.Width; } } //当鼠标离开窗体以后 else { //隐藏到屏幕左边缘 if (this.Left == 0) { this.Left = sideThickness - this.Width; } //隐藏到屏幕右边缘 else if (this.Left == Screen.PrimaryScreen.WorkingArea.Width - this.Width) { this.Left = Screen.PrimaryScreen.WorkingArea.Width - sideThickness; } //隐藏到屏幕上边缘 else if (this.Top == 0 && this.Left > 0 && this.Left < Screen.PrimaryScreen.WorkingArea.Width - this.Width) { this.Top = sideThickness - this.Height; } } }
2022年02月16日
74 阅读
0 评论
0 点赞
2021-12-25
winform窗体透明背景实现
因为winform Form窗体的局限性,不允许设置背景色为transparent。所以不能实现透明背景。这里有一个取巧的方法(截Form后的背景)。首先来看下实现效果: 想要实现半透明效果只要加个panel ,将panel设置为背景色透明,然后加个遮罩图片就可以了。 以下附上实现代码:using System; using System.Drawing; using System.Windows.Forms; namespace WindowsTrans { public partial class Form1 : Form { private Color tr_color = Color.Transparent; private bool b_start = false; bool[] b_visible = null; public Form1() { InitializeComponent(); } private void Form1_Load(object sender, EventArgs e) { SetBackgroundImageTransparent(); } private void SetBackgroundImageTransparent() { Point pt = this.PointToScreen(new Point(0, 0)); Bitmap b = new Bitmap(this.Width, this.Height); using (Graphics g = Graphics.FromImage(b)) { g.CopyFromScreen(pt, new Point(), new Size(this.Width, this.Height)); } this.BackgroundImage = b; } private void BeginSet() { tr_color = this.TransparencyKey; b_start = true; } private void Setting() { if (b_start) { b_visible = new bool[Controls.Count]; for (int i = 0; i < Controls.Count; i++) { b_visible[i] = Controls[i].Visible; Controls[i].Visible = false; } BackgroundImage = null; BackColor = Color.White; b_start = false; this.TransparencyKey = Color.White; } } private void EndSet() { SetBackgroundImageTransparent(); this.TransparencyKey = tr_color; for (int i = 0; i < Controls.Count; i++) { Controls[i].Visible = b_visible[i]; } b_start = false; } private void Form1_Resize(object sender, EventArgs e) { Setting(); } private void Form1_ResizeBegin(object sender, EventArgs e) { BeginSet(); } private void Form1_ResizeEnd(object sender, EventArgs e) { EndSet(); } private void Form1_Move(object sender, EventArgs e) { Setting(); } } }
2021年12月25日
100 阅读
0 评论
0 点赞